Featured
Pass data between screens with Jetpack Compose Navigation + Hilt
Navigating between screens in an Android application is a fundamental aspect of creating a seamless user experience. In this blog I will show how to navigate between different screens while taking advantage of the new type safety mechanism in Jetpack Compose. I will also demonstrate how to share view models in a navigation hierarchy as well as sending data back and forth between screens — empowering you to build more maintainable and scalable apps.
Setup
On top of Jetpack Compose, we need the following libraries:
1. Hilt: implementation guide
2. Hilt-navigation-compose: implementation guide
3. AndroidX Navigation: implementation guide
4. Kotlin Serialization: implementation guide
5. Kotlin Parcelize (recommended): implementation guide
Visual Navigation Graph
We will build a navigation for a hypothetical movie database app. The fully built app resides in the GitHub repo. In this app users can see the movie list, select a movie to edit its details. Here is how the navigation graph looks like:
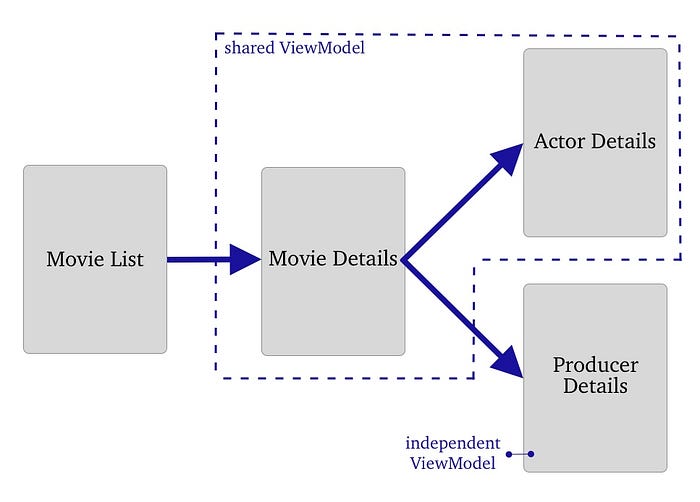
Notice that Movie Details and Actor Details screens are put in one navigation sub-graph called Movie Details Parent. As such they will share a ViewModel. Normally you would also put the Producer Details in the same navigation sub-graph. However, this setup allows us to demonstrate various scenarios you might encounter in your app.
Type Safe Navigation
Instead of passing routes as strings — which is what typically has been done, we will define routes as a sealed class. This will allow us to pass type-safe objects or ids of those objects from one screen to another. The following routes have a mix of objects and ids for demonstration purposes:
import kotlinx.serialization.Serializable

sealed class AppDestination {
  @Serializable
  data object MovieList: AppDestination()

  // parent navigation graph that includes MovieDetails and ActorDetails
  @Serializable
  data object MovieDetailsParent: AppDestination()

  @Serializable
  data class MovieDetails(val movieId: String? = null): AppDestination()

  // because MovieDetails and ActorDetails share a view model, we don't
  // need to pass data back and forth between these destinations
  @Serializable
  data object ActorDetails: AppDestination()

  @Serializable
  data class ProducerDetails(val producer: Producer? = null): AppDestination()
}
You will notice that we have a route named MovieDetailsParent . This parent route combines a sub-graph for Movie Details and Actor Details. It acts more like a container rather than an actual destination. You will see how to set this up in the following section.
Define Navigation Graph
The basic navigation graph looks like this but we have to make some modifications to ensure that we can share the ViewModel in the MovieDetailsParent sub-graph.
// Basic Navigation Graph for the app - requires further modifications
@Composable
fun AppNavHost(
  modifier: Modifier = Modifier,
  navController: NavHostController = rememberNavController(),
  startDestination: AppDestination) {

  NavHost(modifier = modifier,
    navController = navController,
    startDestination = startDestination) {

    composable<AppDestination.MovieList> { navBackStackEntry ->
      MovieListScreen(viewModel = hiltViewModel<MovieListViewModel>())
    }

    navigation<AppDestination.MovieDetailsParent>(startDestination = AppDestination.MovieDetails()) {

      composable<AppDestination.MovieDetails> { navBackStackEntry ->
        MovieDetailScreen(viewModel = hiltViewModel<MovieDetailViewModel>())
      }

      composable<AppDestination.ActorDetails> { navBackStackEntry ->
        ActorDetailsScreen(viewModel = hiltViewModel<MovieDetailViewModel>())
      }
    }

    composable<AppDestination.ProducerDetails> { navBackStackEntry ->
      ProducerDetailsScreen(viewModel = hiltViewModel<ProducerDetailsViewModel>())
    }
  }
}
We are using hiltViewModel in the app to manage the state of the views.
Passing id to the next screen
In this movie database app, when the user selects a movie, the app passes the id to the next screen — Movie Details. This movie id will be available in the respective ViewModel. Let’s enable that by implementing the following changes in the NavHost:
@Composable
fun AppNavHost(...) {
  NavHost(...) {

    composable<AppDestination.MovieList> { navBackStackEntry ->
      MovieListScreen(viewModel = hiltViewModel<MovieListViewModel>(),
        onMovieSelected = { movieId ->
          // pass the movie id to the MovieDetails route
          navController.navigate(route = AppDestination.MovieDetails(movieId))
      })
    }
  ...
  }
}
MovieDetails screen uses the MovieDetailsViewModel. The movie id that was passed as navigation arguments will be available in the SavedStateHandle. When a view model is marked with @HiltViewModel — it automatically gets injected with a SavedStateHandle. You can then proceed to convert the movieId to an actual movie object as shown below:
@HiltViewModel
class MovieDetailsViewModel @Inject constructor(
    private val savedStateHandle: SavedStateHandle,
    private val movieProvider: MovieProvider
): ViewModel() {
  // ...

  init {
    // obtain the movie from its unique identifier
    val selectedMovieId = savedStateHandle.get<String>("movieId")
    if (selectedMovieId != null) {
      // hypothetical movieProvider fetches the actual movie
      val selectedMovie = movieProvider.getMovieById(selectedMovieId)
      if (selectedMovie != null) {
        // do something with the object
      }
    }
  }
}
Sharing a ViewModel between multiple screens
Sometimes we need to share a single instance of a view model among multiple screens — especially when the screens are co-located in a sub-graph as in the Movie and Actor Details Screens. In order to enable sharing of ViewModels across multiple screens, we have to build the ViewModels differently in the sub-graph. First add this extension somewhere in your app — perhaps the NavHost file.
@Composable
inline fun <reified T: ViewModel> NavBackStackEntry.scopedViewModel(
  navController: NavHostController): T {
  // if the destination route doesn't have a parent create a brand
  // new view model instance
  val navGraphRoute = destination.parent?.route ?: return hiltViewModel()

  // the destination does have a parent screen
  val parentEntry: NavBackStackEntry = remember(key1 = this) {
    navController.getBackStackEntry(navGraphRoute)
  }

  // return the view model associated with the parent destination
  return hiltViewModel(parentEntry)
}
Now we can create a shared view model, change the original NavHost to something like this:
@Composable
fun AppNavHost() {
  NavHost() {
    ...
    navigation<AppDestination.MovieDetailsParent>(startDestination = AppDestination.MovieDetails()) {

      // create a shared view model that is scoped to this sub-graph
      // use this view model instance in both screens
      val movieDetailsViewModel = navBackStackEntry.scopedViewModel<MovieDetailsViewModel>(navController)

      composable<AppDestination.MovieDetails> { navBackStackEntry ->
        MovieDetailScreen(viewModel = movieDetailsViewModel,
          onAddOrEditActor = {
            // since this screen shares a view model with Actor Details Screen
            // there is no need to pass any data - everything is already
            // available in movieDetailsViewModel.
            navController.navigate(AppDestination.ActorDetails)
          })
      }

      composable<AppDestination.ActorDetails> { navBackStackEntry ->
        // note that ActorDetailsScreen gets the same movieDetailsViewModel
        // instance as in MovieDetailScreen.
        ActorDetailsScreen(viewModel = movieDetailsViewModel)
      }
    }
    ...
  }
}
After these changes both of these screens now share a view model, all the data and all the state. There is no need to pass any id to the next screen because the next screen already “knows” what the selected id is. But sharing viewmodels across multiple screens are not always feasible, desired or practical. We have to resort to other mechanisms to send data across navigation hierarchy. Read on...
Passing objects to other screen as nav arguments
Sometimes it is not practical to send an id to another screen. It may be just easier to send the entire object. In our hypothetical app, we already mentioned earlier that we were going to do this with the ProducerDetails screen. Note that the ProducerDetails route either takes null or a Producer object as a navigation argument. So in order to facilitate this we have a Producer data type that is both serializable and parcelable such as this.
import android.os.Parcelable
import kotlinx.parcelize.Parcelize
import kotlinx.serialization.Serializable

@Parcelize
@Serializable
data class Producer(val id: String,
                    val firstName: String,
                    val lastName: String,
                    val isExecutive: Boolean): Parcelable
Tip: It is actually possible to make this work only by confirming to Serializable; however, I think that also conforming to Parcelable with Kotlin’s Parcelize library is overall more practical.
Since we are passing the entire object as a navigation argument, we need to map the Producer data class to a NavType — a type that compose navigation is designed to work with. We need to add this extension function somewhere in your app.
inline fun <reified T : Parcelable?> navType(
  isNullableAllowed: Boolean = true,
  json: Json = Json,
) = object : NavType<T>(isNullableAllowed = isNullableAllowed) {
  override fun get(bundle: Bundle, key: String): T? {
    return if (Build.VERSION.SDK_INT >= Build.VERSION_CODES.TIRAMISU) {
      bundle.getParcelable(key, T::class.java)
    } else {
      @Suppress("DEPRECATION")
      bundle.getParcelable(key)
    }
  }

  override fun parseValue(value: String): T {
    val deserializedResult = json.decodeFromString<T>(value)
    return deserializedResult
  }

  override fun serializeAsValue(value: T): String {
    return if (value == null) {
      ""
    } else {
      json.encodeToString(value)
    }
  }

  override fun put(bundle: Bundle, key: String, value: T) {
    if (value == null) {
      bundle.putParcelable(key, null)
    } else {
      bundle.putParcelable(key, value)
    }
  }
}
Now in your NavHost we need to pass this mapping in the App Destination thusly:
@Composable
fun AppNavHost() {
  NavHost() {
    // ...
    composable<AppDestination.MovieDetails> { navBackStackEntry ->
      MovieDetailScreen(viewModel = movieDetailsViewModel,
        onAddOrEditActor = { ... },
        onAddOrEditProducer = { producer ->
          // pass the producer data directly to ProducerDetails screen
          navController.navigate(AppDestination.ProducerDetails(producer))
      })
    }

    ...

    // ProducerDetails screen needs to know how to serialize/parcelize
    // the Producer data type if another screen passes it as a navigation
    // argument. this is why we have to add this type map below.
    composable<AppDestination.ProducerDetails>(
      typeMap = mapOf(
        typeOf<Producer>() to navType<Producer>(),
        typeOf<Producer?>() to navType<Producer?>())
    ) { navBackStackEntry ->

      ProducerDetailsScreen(
        viewModel = hiltViewModel<ProducerDetailsViewModel>(),
        onSaveProducer = { /* TODO */ },
        onDismissScreen = { /* TODO */ },
      )
    }
  }
}
Then in ProducerDetailsViewModel, you can fetch the passed Producer data from SavedStateHandle as follows :
@HiltViewModel
class ProducerDetailsViewModel @Inject constructor(
    private val savedStateHandle: SavedStateHandle,
): ViewModel() {
  // ...

  init {
    // "producer" key needs to match the property name in AppDestination.ProducerDetails
    val passedProducer: Producer? = savedStateHandle.get<Producer>(key = "producer")
    // ...
  }
}
As you can see, this option is sometimes more practical especially for simpler data types because it removes the need to reconstitute the object from an external data source.
The next challenge is a bit more interesting. We have to let the previous screen know the actions user has taken on the current screen. In this scenario we are not sharing any view models across multiple screens so we create wiring across the NavGraph to send data back.
Sending data back to previous screen
One of the most important aspects of the mobile navigation is that when a user makes a selection — for example from a date picker, the previous screen “knows” what date has been selected. There are multiple possibilities to facilitate this inter screen communication — such as saving the information in a temporary cache or by sharing a view model as we just demonstrated earlier. In this blog I will show “SavedStateHandle” as a mechanism to send data back to a a previous screen. SavedStateHandle is actually designed to survive a process death so that you can restore your view when the user returns to your app. They can also be used to establish communication between NavBackStackEntries.
First we announce the selected producer in the nav graph like so:
@Composable
fun AppNavHost() {
  NavHost() {
    ...

    ProducerDetailsScreen(
      viewModel = hiltViewModel<ProducerDetailsViewModel>(),
      onSaveProducer = {
        // send the selected producer to the previous back stack
        navController.previousBackStackEntry?.savedStateHandle["producer"] = it
        navController.popBackStack()
      },
      onDismissScreen = { /* TODO */ },
    )
    ...
  }
}
Or:
@Composable
fun AppNavHost() {
  NavHost() {
    ...

    val producerDetailsViewModel = hiltViewModel<ProducerDetailsViewModel>()

    // observe the selected producer from the view model
    // then pass it to the previous screen
    val selectedProducer = producerDetailsViewModel
                .selectedProducerFlow
                .collectAsStateWithLifecycle(null)
    navController.previousBackStackEntry?.savedStateHandle["producer"] = selectedProducer

    ProducerDetailsScreen(
      viewModel = producerDetailsViewModel,
      onSaveProducer = {
        // simply go back to the screen
        navController.popBackStack()
      },
      onDismissScreen = { /* TODO */ },
    )
    ...
  }
}
Now that the ProducerDetails screen is publishing the selected Producer information, the previous screen (in this case MovieDetails) has to listen in like so:
@Composable
fun AppNavHost() {
  NavHost() {
    ...

    composable<AppDestination.MovieDetails> { navBackStackEntry ->
      val movieDetailsViewModel = navBackStackEntry.scopedViewModel<MovieDetailsViewModel>(navController)

      // you can retrieve the selected producer from the savedStateHandle
      val selectedProducer = navBackStackEntry.savedStateHandle.get<Producer>("producer")
      if (selectedProducer != null) {
        // then pass the information to a flow in the view model
        // please note that this line may fire multiple times as
        // we are in a composable scope
        movieDetailsViewModel.producersFlow.tryEmit(selectedProducer)
      }

      MovieDetailsScreen(viewModel = movieDetailsViewModel, ...)
    }
    ...
  }
}
Then the view model in question looks like this:
@HiltViewModel
class MovieDetailsViewModel @Inject constructor(...): ViewModel() {
  ...
  // you may need to configure your flow so that it can re-publish the last emission
  // this depends on your app architecture and how you listen to events
  val producersFlow: MutableSharedFlow<Producer> = MutableSharedFlow(replay = 1)

  fun configureObservers() = viewModelScope.launch {
    producersFlow
      .distinctUntilChanged() // ignores multiple identical events
      .collect { selectedProducer ->
      //do something with the selection
    }
  }
  ...
}
Tip: As explained in the code comments, events generated on producersFlow will trigger multiple times since it is called in a composable scope. On the listening end, you probably want to omit identical events.
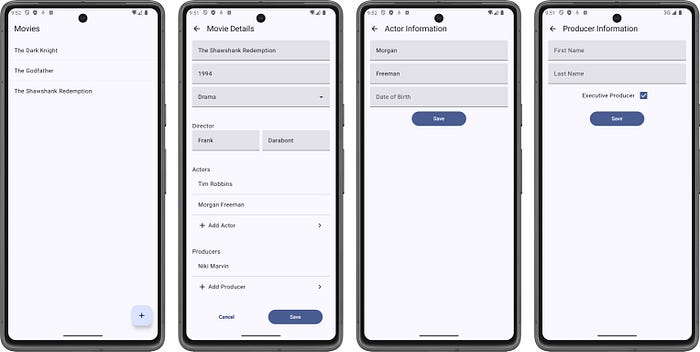
Result
Conclusion
In this blog we demonstrated multiple mechanisms to establish communication between compose based screens. This is not an exhaustive list — there are other ways to send data back and forth between various screens with Compose. Which mechanism you use will depend on your app’s architecture and other dependencies you might be using. There is no one single way that works in all scenarios. If you want to download the final solution, head out to our GitHub repository. Hope you found this blog useful and let us know if you have ideas to improve the navigation experience for the developers.